1. csrutil disable:
To enable writing to /sbin you need to run curtail disable in a recovery mode terminal. csrutil enable will re-lock the system directories.
To get to recovery mode you can hold command+R during the boot process, and you can run a terminal from the menu.
2. Install the latest version of osxfuse:
Get the latest osxfuse dmg from github https://github.com/osxfuse/osxfuse/releases, and install it.
3. Install rtfs-3g:
1) Install Homebrew:
ruby -e "$(curl -fsSL https://raw.githubusercontent.com/Homebrew/install/master/install)"
2) Update Homebrew formulae:
brew update
3) Install ntfs-3g:
brew install rtfs-3g
4. Create a symlink for mount_nfs:
sudo mv /sbin/mount_ntfs /sbin/mount_ntfs.original
sudo ln -s /usr/local/Cellar/ntfs-3g/2015.3.14/sbin/mount_ntfs
5. Reboot:
6. csrutil enable:
2015년 10월 3일 토요일

2015년 1월 28일 수요일
Using SQLite Browser in Android Studio
1. Go to:
https://code.google.com/p/android-sqlite-browser-for-eclipse/wiki/HowTo
2. Download Android_SQLiteBrowser_x.x.x.jar
3. Move the downloaded jar file to [Android SDK folder]/tools/lib/monitor-x86_64/plugins/
4. Restart Android Device Monitor
https://code.google.com/p/android-sqlite-browser-for-eclipse/wiki/HowTo
2. Download Android_SQLiteBrowser_x.x.x.jar
3. Move the downloaded jar file to [Android SDK folder]/tools/lib/monitor-x86_64/plugins/
4. Restart Android Device Monitor
2014년 11월 2일 일요일
Eclipse Navigation Shortcuts
Windows shortcut (Mac shortcut)
1. Ctrl+Shift+R (Command+Shift+R): Open Resource
2. Ctrl+Shift+T (Command+Shift+T): Open Type
3. Ctrl+O (Command+O): Show inherited members
4. Ctrl+L (Command+L): Go to line
5. Ctrl+Q: Go to the last edit location
6. Ctrl+T (Command+T): Go to supertype/subtype
7. Ctrl+E (Command+E): Go to open other editors
8. Ctrl+. (Command+.): Move to the next problem in a file
9. F3 (Fn+F3) or hold Ctrl (Command) down and click the hyperlink: Go to a type declaration
10. Alt+←, Alt+→ (Command+Alt+←, Command+Alt+→): Go back and forth through files you visited
11. Ctrl+H (Ctrl+H): Search
2014년 9월 13일 토요일
Failed to load the JNI shared library jvm.dll
ref: http://wiki.eclipse.org/Eclipse.ini
Eclipse may fail to start saying "Failed to load the JNI shared library C:\Program Files ...\jvm.dll."
When this error occurs, you should check the OS, JDK, and Eclipse. The working pairings of OS, JDK, and Eclipse are:
Eclipse may fail to start saying "Failed to load the JNI shared library C:\Program Files ...\jvm.dll."
When this error occurs, you should check the OS, JDK, and Eclipse. The working pairings of OS, JDK, and Eclipse are:
- 32bit OS - 32bit JDK - 32bit Eclipse
- 64bit OS - 64bit JDK - 64bit Eclipse
- 64bit OS - 32bit JDK - 32bit Eclipse
2014년 5월 15일 목요일
2014년 5월 8일 목요일
SQLite GUI Tool
For Windows OS: SQLite Administrator
For Mac OS: SQLite Manager (Firefox add-ons)
SQLite Manager plugin for Eclipse: ref1, ref2
For Mac OS: SQLite Manager (Firefox add-ons)
SQLite Manager plugin for Eclipse: ref1, ref2
2014년 5월 7일 수요일
vi Commands
General Startup
 To use vi: vi filename
 To exit vi and save changes: ZZ   or  :wq
 To exit vi without saving changes: :q!
 To enter vi command mode: [esc]

Counts
  A number preceding any vi command tells vi to repeat that command
 that many times.

Cursor Movement
  h   move left (backspace)
  j   move down
  k   move up
  l   move right (spacebar)
  [return]   move to the beginning of the next line
  $   last column on the current line
  0   move cursor to the first column on the current line
  ^   move cursor to first nonblank column on the current line
  w   move to the beginning of the next word or punctuation mark
  W   move past the next space
  b   move to the beginning of the previous word or punctuation mark
  B   move to the beginning of the previous word, ignores punctuation
  e   end of next word or punctuation mark
  E   end of next word, ignoring punctuation
  H   move cursor to the top of the screen
  M   move cursor to the middle of the screen
  L   move cursor to the bottom of the screen

Screen Movement
  G   move to the last line in the file
  xG  move to line x
  z+  move current line to top of screen
  z   move current line to the middle of screen
  z-  move current line to the bottom of screen
  ^F  move forward one screen
  ^B  move backward one line
  ^D  move forward one half screen
  ^U  move backward one half screen
  ^R  redraw screen (does not work with VT100 type terminals)
  ^L  redraw screen (does not work with Televideo terminals)

Inserting
  r   replace character under cursor with next character typed
  R   keep replacing character until [esc] is hit
  i   insert before cursor
  a   append after cursor
  A   append at end of line
  O   open line above cursor and enter append mode

Deleting
  x   delete character under cursor
  dd  delete line under cursor
  dw  delete word under cursor
  db  delete word before cursor

Copying Code
  yy  (yank)'copies' line which may then be put by the p(put)
     command. Precede with a count for multiple lines.

Put Command
  brings back previous deletion or yank of lines, words, or
 characters
  P   bring back before cursor
  p   bring back after cursor

Find Commands
  ?   finds a word going backwards
  /   finds a word going forwards
  f   finds a character on the line under the cursor going forward
  F   finds a character on the line under the cursor going backwards
  t   find a character on the current line going forward and stop one
     character before it
  T   find a character on the current line going backward and stop
     one character before it
  ;   repeat last f, F, t, T

Miscellaneous Commands
  .   repeat last command
  u   undoes last command issued
  U   undoes all commands on one line
  xp  deletes first character and inserts after second (swap)
  J   join current line with the next line
  ^G  display current line number
  %   if at one parenthesis, will jump to its mate
  mx  mark current line with character x
  'x  find line marked with character x
  NOTE: Marks are internal and not written to the file.

Line Editor Mode
  Any commands form the line editor ex can be issued upon entering
 line mode.
  To enter: type ':'
  To exit: press[return] or [esc]

ex Commands
  For a complete list consult the UNIX Programmer's Manual

READING FILES
  copies (reads) filename after cursor in file currently editing
  :r  filename

WRITE FILE
  :w  saves the current file without quitting

MOVING
  :#  move to line #
  :$  move to last line of file

SHELL ESCAPE
  executes 'cmd' as a shell command.
  :!'cmd'
2014년 5월 6일 화요일
Installing Tomcat on Mac OS
Step 1: Download a binary distribution of the core module: apache-tomcat-7.0.53.tar.gz (or apache-tomcat-7.0.53.zip) from here.
Step 2: Opening or Unarchiving the tar.gz (or zip) file will create a folder something like this in your Downloads folder ~/Downloads/apache-tomcat-7.0.53
Step 3: Move the unarchived distribution to /usr/local:
sudo mkdir /usr/local sudo mv ~/Downloads/apache-tomcat-7.0.53 /usr/local
Step 4: To make it easy to replace this release with future releases, we are going to create a symbolic link that we are going to use when referring to Tomcat:
sudo ln -s /usr/local/apache-tomcat-7.0.53 /Library/Tomcat
Step 5: Change ownership of the /Library/Tomcat folder hierarchy:
sudo chown -R /Library/Tomcat
Step 6: Make all scripts executable:
sudo chmod +x /Library/Tomcat/bin/*.sh
Step 7: Now executes the startup.sh and open your Web Browser and goto http://localhost:8080. You should see the following window.

You can use the very simple app Tomcat Controller.


Step 2: Opening or Unarchiving the tar.gz (or zip) file will create a folder something like this in your Downloads folder ~/Downloads/apache-tomcat-7.0.53
Step 3: Move the unarchived distribution to /usr/local:
sudo mkdir /usr/local sudo mv ~/Downloads/apache-tomcat-7.0.53 /usr/local
Step 4: To make it easy to replace this release with future releases, we are going to create a symbolic link that we are going to use when referring to Tomcat:
sudo ln -s /usr/local/apache-tomcat-7.0.53 /Library/Tomcat
Step 5: Change ownership of the /Library/Tomcat folder hierarchy:
sudo chown -R
You can use the very simple app Tomcat Controller.
2013년 12월 9일 월요일
JavaScript 실습 환경 세팅
JavaScript를 공부하고 실습하기 위한 환경을 위해 필요한 프로그램들을 소개하도록 하겠습니다.
1. JDK를 설치합니다.
PC에 JDK가 설치되어 있지 않다면 설치해야 합니다. http://www.oracle.com/technetwork/java/javase/downloads/index.html에서 최신 버전의 JDK를 다운받아 설치하시면 됩니다.
2. 예제 파일을 실행하기 위한 브라우저가 필요합니다.
아직까지도 IE는 HTML5를 제대로 지원하지 못하고 있기 때문에 IE 이외의 다른 브라우저도 설치하셔서 실습 파일들을 실행해 보도록 합니다. 아래에 몇 가지 브라우저들을 다운받을 수 있는 링크를 정리했습니다.
1. JDK를 설치합니다.
PC에 JDK가 설치되어 있지 않다면 설치해야 합니다. http://www.oracle.com/technetwork/java/javase/downloads/index.html에서 최신 버전의 JDK를 다운받아 설치하시면 됩니다.
2. 예제 파일을 실행하기 위한 브라우저가 필요합니다.
아직까지도 IE는 HTML5를 제대로 지원하지 못하고 있기 때문에 IE 이외의 다른 브라우저도 설치하셔서 실습 파일들을 실행해 보도록 합니다. 아래에 몇 가지 브라우저들을 다운받을 수 있는 링크를 정리했습니다.
- Chrome: https://www.google.com/intl/en/chrome/browser/
- Firefox: http://www.mozilla.or.kr/ko/firefox/features/
- Opera: http://www.opera.com/
3. PC에 서버 환경을 만들고 테스트를 하고자 한다면 Apache Tomcat을 설치하시면 됩니다.
http://tomcat.apache.org/에서 원하시는 버전을 다운받고 PC에 설치하면 됩니다.
4. Editor가 필요합니다.
단순히 Notepad를 이용해서 HTML과 JS 파일들을 작성할 수도 있습니다. Java 개발자라면 Eclipse 환경에 익숙하실 것입니다. 웹 개발자라면 Dreamweaver를 많이 사용해 보셨을 수도 있습니다.
상용 프로그램인 Dreamweaver만은 못하겠지만, Web application을 작성할 수 있는 IDE 중에 무료로 사용할 수 있는 Aptana Studio라는 것이 있습니다. Eclipse에 plug-in 형태로 설치해서 사용할 수도 있고, stand-alone 버전으로 설치해서 사용할 수도 있습니다. Aptana Studio는 아래 사이트에서 다운받아서 설치하실 수 있습니다.
2013년 12월 5일 목요일
mp4 파일을 ogv 또는 webm 형식으로 변환하기
HTML5에서는 <video> 태그를 사용해서 웹페이지에 동영상 파일을 넣을 수 있게 되었습니다. 문제는 플러그인 없이 브라우저에서 직접 재생할 수 있는 비디오 코덱만 허용하고 있는데, 이것이 아직 한가지 코덱으로 표준이 정해지지 않았고, 그래서 브라우저마다 재생할 수 있는 동영상 파일의 종류가 다를 수 있다는 점입니다.
HTML5에서 지원되는 비디오 포맷은 MP4, WebM, Ogg(Ogv)입니다. 각 포맷의 비디오/오디오 코덱은 아래와 같습니다.
시중에는 많은 (상용/무료) 동영상 변환 프로그램들이 있는데요, Firefox의 add-on을 이용하면 mp4 파일을 ogv/webm 파일로 간단히 변환할 수 있는 방법이 있어서 소개해 드리려고 합니다.



HTML5에서 지원되는 비디오 포맷은 MP4, WebM, Ogg(Ogv)입니다. 각 포맷의 비디오/오디오 코덱은 아래와 같습니다.
- mp4: H.264/AVC
- webm: VP8/Vorbis
- ogv: Theora/Vorbis
시중에는 많은 (상용/무료) 동영상 변환 프로그램들이 있는데요, Firefox의 add-on을 이용하면 mp4 파일을 ogv/webm 파일로 간단히 변환할 수 있는 방법이 있어서 소개해 드리려고 합니다.
Firefox 브라우저를 실행하고 www.firefogg.org에 접속하면 firefogg를 인스톨할 수 있습니다.


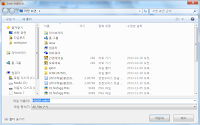
firefogg add-on을 설치하고 나면 Firefox-> Make Video를 클릭하면 파일 변환을 할 수 있는 사이트가 열립니다.

Select File을 클릭해서 변환할 동영상 파일을 선택하고 Format(ogv/webm)과 Preset을 선택한 후에 Encode를 클릭하면 원하는 파일 형식으로 변환할 수 있습니다.


2013년 12월 4일 수요일
Internet Explorer에 Developer Toolbar 설치하기
Chrome과 Firefox에서 Web Developer 툴을 설치해서 사용하는 것과 비슷하게 IE에서도 Developer Toolbar를 설치하면 웹 페이지의 HTML과 CSS 소스를 볼 수 있습니다.


Microsoft Download Center에서 Developer Toolbar를 검색하면 Internet Explorer Developer Toolbar를 찾을 수 있습니다. 이것을 다운로드 받아서 설치하시면 됩니다.


Developer Toolbar가 설치되면 F12 키를 누르거나, 도구 -> F12 개발자 도구(L)를 클릭해서 사용하면 됩니다.
단, IE Developer Toolbar는 IE8과는 호환되지 않습니다. IE9 이상의 버전에서 사용 가능합니다.
단, IE Developer Toolbar는 IE8과는 호환되지 않습니다. IE9 이상의 버전에서 사용 가능합니다.
2013년 12월 3일 화요일
Chrome과 Firefox에 Web Developer 설치하기
웹 페이지를 보면서 어떻게 만들었을 지 궁금해 했었다면 개발자 도구를 이용해서 HTML과 CSS 소스를 간편하게 확인할 수 있습니다.
Chrome 브라우저와 Firefox 브라우저에서 개발자 도구를 설치하는 방법은 조금 다릅니다.
Chrome에 Web Developer 설치하기


Chrome 브라우저와 Firefox 브라우저에서 개발자 도구를 설치하는 방법은 조금 다릅니다.
Chrome에 Web Developer 설치하기
1. Chrome Webstore(http://chrome.google.com/webstore/category/apps)에 접속합니다.

2. "Web Developer"를 검색해서 Web Developer 도구를 찾았으면 오른쪽의 [+ FREE] 버튼을 클릭

3. 팝업창이 나타나면 [추가] 버튼을 클릭해서 설치

Web Developer가 설치되면 Chrome 주소 표시줄 오른쪽에 톱니바퀴 모양 아이콘  이 추가됩니다. 이 아이콘을 누르면 Web Developer의 기능들을 사용할 수 있습니다.
FireFox에 Web Developer 설치하기
1. Firefox -> Add-ons(부가 기능) 클릭

2. Web Developer를 검색해서 [Install(설치하기)] 클릭

3. 설치 후 [Restart now(다시 시작)]을 클릭해서 Firefox를 다시 시작

4. 브라우저 상단에 툴바가 생김

이렇게 Chrome 또는 Firefox에 Web Developer 툴을 설치하면 여러가지 기능들을 사용할 수 있습니다. 예를 들어 Chrome에서는 CSS -> Disable All Styles, Firefox에서는 CSS -> Disable Styles -> Disable All Styles 기능을 사용하면 웹페이지에서 CSS를 제거해서 볼 수 있습니다.
2013년 12월 2일 월요일
Notepad++ 한글 깨짐 현상 해결
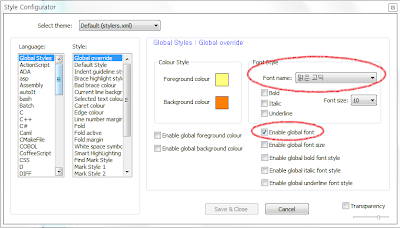
Notepad++를 사용할 때 한글 입력이 깨져서 ㅁㅁㅁ으로 보이는 현상이 발생하기도 합니다. 이것은 편집기의 기본글꼴이 Courier New인데 한글 지원이 되지 않아서 생기는 현상으로 보입니다. 이 문제를 해결하기 위해서는 다음과 같이 하면 됩니다.
Settings -> Style Configurator -> Font Style에서 한글 지원 글꼴(예: 맑은 고딕) 선택 -> "Enable global font" 체크
(설정 -> 스타일 환경설정 -> 글꼴 스타일에서 한글 지원 글꼴(예: 맑은 고딕) 선택 -> "전역 글꼴 사용" 체크)
(제 개인적으로 프로그래밍을 할 때는 Courier New와 같은 monospaced(fixed-width) 폰트를 선호하는데요, 한글 깨짐 문제가 발생할 때는 어쩔 수가 없네요.)
Settings -> Style Configurator -> Font Style에서 한글 지원 글꼴(예: 맑은 고딕) 선택 -> "Enable global font" 체크
(설정 -> 스타일 환경설정 -> 글꼴 스타일에서 한글 지원 글꼴(예: 맑은 고딕) 선택 -> "전역 글꼴 사용" 체크)

(제 개인적으로 프로그래밍을 할 때는 Courier New와 같은 monospaced(fixed-width) 폰트를 선호하는데요, 한글 깨짐 문제가 발생할 때는 어쩔 수가 없네요.)
Text Editors
HTML5 편집과 프로그래밍을 하기 위해서는 텍스트 에디터가 필요합니다. 시중에는 많은 상용 소프트웨어와 프리/쉐어웨어들이 나와 있습니다. 상용 소프트웨어를 사용하는 것도 좋겠지만 좋은 프리웨어도 많기 때문에 그 중 몇 가지를 추천드리려고 합니다.
Windows용으로는 제가 추천하는 것은 Notepad++입니다.
그리고, Mac OS용으로는 TextWrangler를 추천합니다.
HTML 전용 editor로는 Kompozer라는 프리웨어도 있습니다. Windows와 Mac OS, 그리고 Linux에서도 사용할 수 있습니다.
WYSWYG(What You See is What You Get) 편집기의 대표적인 프로그램으로는 드림위버(Adobe Dreamweaver)가 있습니다.
Windows용으로는 제가 추천하는 것은 Notepad++입니다.
그리고, Mac OS용으로는 TextWrangler를 추천합니다.
HTML 전용 editor로는 Kompozer라는 프리웨어도 있습니다. Windows와 Mac OS, 그리고 Linux에서도 사용할 수 있습니다.
WYSWYG(What You See is What You Get) 편집기의 대표적인 프로그램으로는 드림위버(Adobe Dreamweaver)가 있습니다.
피드 구독하기:
글 (Atom)